Guide: How To Collect Video Content For Connected TV Video Ads
How To Create A Great Video Ad
Think about what the end result of your video will be. What is the target audience, what is the message you wish to convey, and how do you want your audience to feel/what do you want them to think after viewing your video ad? Start with the end goal in mind, and work backwards, creating a story through video.
Have A Plan & Shoot With Purpose
- We don’t do haphazard. Define what the purpose is, write a script, plan your shots. Production done without a plan is only good on accident.
- Break down the production into smaller tasks.
- Pre-Production:
- What are the specific shots, voiceover, interview and other key elements that need to be collected?
- Who is your talent? Where will different shots take place? Who will perform what roles?
- When will the video collection take place? Will the location be open/closed? If not your property, do you have permission to be there?
- What will the lighting look like at the chosen time?
- Who else will be on location and how do you control your set?
- Production:
- Do you have water available for talent so they don’t get dry mouth while speaking?
- Do you have multiple camera / lighting / microphone batteries charged? Make sure you can complete your shots. Splitting things into multiple days will affect your finished product (it won’t look or sound the same unless you’re in a strictly controlled environment)
- Are there any adjustments that need to be made due to weather?
- Post-Production:
- Think about final product, did you shoot everything you would need to tell a complete story?
- Do you have a safe hard drive/storage location to keep all the footage and the project?
- When will the video collection take place? Will the location be open/closed? If not your property, do you have permission to be there?
- What will the lighting look like at the chosen time?
- Who else will be on location and how do you control your set?
Video Ad Commercial Release, License, Rights & Consent
The rules for using material for use in ads is different from other use cases. When producing an ad, it is automatically Commercial Speech. What’s that mean?
- Commercial Release of Talent: do you have documented consent to use your talent in a commercial video? If you can identify the subject, you need this.
- Copyright, License and Usage Rights: There’s no “fair use” or derivative way that you are permitted to monetize someone else’s copyright. You must have copyright or license to use assets. This means music, sound effects, photos, logos, other graphics, basically everything. If it’s not yours or you have not obtained license for it, don’t use it.
- Royalty Free: This is commonly misunderstood as it relates to commercial production. “Royalty Free” does not necessarily mean you have license to use it. What you’re actually looking for is Royalty Free with Commercial Usage.
Basically, you must have either created the material (visuals and audio) yourself, paid for the license/transfer of copyright, or received other documentation that you are able to use the creative material commercially. This is not meant to be scary, but it is a legal area which is taken very seriously. When you provide commercial video to Levy Online, you are certifying you have the lawful permission to use it commercially, and understand that you maintain any/all liability for violating the copywritten works of others.
What Kind of Content To Shoot
Your video will basically be comprised of only a few types of material. There’s a lot of types of shots & formats, but we’ll focus on a few summary shots here for simplicity:
- A-Roll or Primary Footage: feature the primary subject or narrative focus, such as an interview or presenter
- B-Roll: Supplemental footage used to add context, illustrate or enhance other content. This might be close ups of objects, detail shots, scenery, or action shots.
- Hero Shots/Establishing Shot: sets the scene, such as a wide angle that shows a location or a setting. Your building’s facade,
Various shot types have a unique storytelling function and feel, useful for creating dynamic video and instilling a desired feeling in your viewers.
How To Shoot Good B-Roll
The purpose of good B-Roll is to help contextualize the subject matter, to illustrate detail or provide a close-up of interesting action.
- Detail Shots
- close ups on fine details
- panning across products, awards & accolades
- a super-close shot showing the texture of a subject
- example: on a freshly cut orange, a full-frame visual of the orange showing the juices leaking from the flesh of the fruit
- logos, interesting or relevant signage
- footage showcasing features or other items that are mentioned in the voiceover
- Action Shots
- shoot close & medium
- use this to showcase technical skill, flashy or fan favorite moments
- example: flambe, footage both tight into the pan/flames and also footage of the chef working the pan/flames
- example: a ribbon cutting, footage both tight where the scissors meet the ribbon, and footage of the general scene
- Personality Shots
- members of your staff waving, interacting with guests, showing company culture or footage that captures the guest experience
B-Roll should not be dependent on its own audio (assume all the audio in your B-Roll is discarded and replaced with voiceover or the audio from separate interview footage). After filming your B-Roll, record around a minute of ambient audio of the environment. Example: the chatter of a crowd, the rustling of leaves, footsteps, the fire/sizzle and sloshing of a flambe. These may be added back to a scene to enhance the realism.
Don’t be afraid of movement, just move smoothly with intention. A tripod is good for stability and repeat shots, but motion conveys energy. Capture slow pans, tracking with walking; pans or tilts with a chef’s skillet while cooking; loosely follow the shaker as a bartender makes a drink. Importantly, give yourself options in editing.
How To Shoot Good Interviews
- Choose a Comfortable, Quiet Location
- Find a quiet, controlled environment where the interviewee feels comfortable. Avoid areas with loud background noise, as it can distract from the interview and make audio editing challenging.
- If infringing audio is picked up, repeat the line. Sirens outside? Wait for them to go away, then do it again. Be observant about external audio that will make a clip unusable or very difficult to edit.
- Prioritize Good Audio Quality
- Use a quality microphone (such as a lavalier or shotgun mic) close to the subject to capture clear audio. Test the audio beforehand, and always monitor levels throughout the interview to avoid any issues.
- Remember that your interview video might be replaced with B-Roll, but the audio remains. This means the audio does the heavy-lifting, visuals are there to keep the interest of the viewer.
- Frame the Shot Intentionally
- Avoid pointing the camera squarely at someone, and avoid having them exactly in the center
- Position the interviewee using the rule of thirds, where they’re slightly off-center, looking across the empty space. This adds visual interest and creates a more natural look, especially if they’re speaking to an off-camera interviewer
- Ensure sure you have a clean, undistracting background. Be mindful of reflections in windows/framed art/mirrors/etc. to avoid seeing the camera or unintended elements in the reflection. Remember that reflections can be seen in many objects (glassware, metal objects, etc.)
- Use Soft, Diffused Lighting
- Soft lighting (such as through diffusers or natural light) avoids harsh shadows and flatters the subject
- You can place lights at a 45-degree angle from the interviewee to create depth and dimension, making them appear more natural
- Encourage Authenticity and Comfort
- Warm up with casual questions to make the interviewee feel at ease and encourage them to speak naturally. Maintain eye contact and listen actively to build rapport, making it easier for them to open up and feel less scripted.
- Ask talent to rephrase the question as a part of their answer, and turn it into a standalone statement. Don’t make their part of the interview completely dependent on the interviewer’s audio.
- Unless a conversational (newsy) interview is the objective, make sure you pause briefly before changing who is speaking. Allow time for a clean cut between audio. Don’t talk over each other, this makes a cut nearly impossible.
- Let the person completely finish speaking before asking the next question or moving on to the next lines.
- Pause between questions so their sentences don’t run into each other. Leave gaps between major statements/key points to allow for a cut if it is warranted.
- Make a mistake? Pause and restart a sentence if it comes out wrong.
- Fix Shiny Foreheads
- Don’t put someone on camera and not give them the respect of making them look good
- Please tell your talent to pat their forehead dry, or help them. Even a little bit of sweat + lighting can show up (sometimes as a vibrant white light) on someone’s head. It’s distracting and not a good look.
- When you’re on-camera talent, it’s okay for everyone to use a little makeup.
- Ahem: gentlemen… we can do it too. And we should. Either mop up your talent with a cloth, or put on some powder. I’d rather have a little bit of makeup on (someone would need to help me, I don’t know how to do it) as opposed to looking wet and swampy.
Your audio is critical so respect it! Visuals will help convey context and interest, but audio is where we efficiently connect, perceive emotion and determine meaning. Consider this: you would understand your favorite television show blindfolded by listening to the audio; but watch it on mute (without captions) and it will lose most of its meaning.
How To Make Your Video Look Great
From the sections above we learned what to shoot based on the content you need. Now let’s learn more about how to shoot video that looks great!
Best Practices for Video
- Layout
- Film everything horizontally (landscape orientation) unless there’s a specific need or request for vertical video.
- Connected TV shows on television devices, so the format requirement is universally horizontal aspect ratio.
- Resolution
- Minimum footage resolution is 1920×1080.
- Ideally, shoot in 2K or 4K. This will allow cropping, zooming and other editing options in post production.
- Frame Rate
- 23.98/24 or 29.97/30. For television sets in the US, 29.97 is preferred.
- If you would like any footage in slow motion, shoot at a higher framerate, like 60+
- Finished Product Specifications
- Reminder that the final video product must meet Connected TV Video Specifications. These apply to how the video is output from your editing/post-production software, but before you film, you should keep these in mind.
Don’t be afraid to shoot the same scene several times. Someone botch their lines? Do it again. Words not quite roll off the tongue correctly? Do it again. Everything seemed great? Do it again from a different angle! When editing, it’s good to have options.
Video Production Tips to Look More Professional
- Ensure everything that’s in frame is there intentionally
- Clean surfaces (dirty surfaces may show to the camera more than you can see)
- You may need to buff recently-cleaned surfaces with a dry cloth to remove streaks
- Tidy anything visible in the background, reduce clutter
- Empty the pockets of your individuals who are on camera
- Turn products with recognizable brands/logos away from the camera (soda cans) or better, remove them from the scene
- Your Talent/Actors
- Do not wear heavily-pattered clothing, particularly thin stripes. This causes something called the Moiré Effect in cameras and it looks atrocious. See the Moiré example below so we can avoid creating ugly patterns in video together.
- Unless the logo is yours, don’t have logos visible on clothing. A big clothing brand’s logo on a shirt or jacket? Now the video isn’t about you, and it looks tacky. Set the expectation with everyone who will be on camera – the only branding that should be seen is yours. If there’s not clothing options specific to your company, talent should wear generic clothing.
- Lighting
- Make sure your subject is well-lit. Shoot in brightly-lit locations
- Avoid backlighting the focus on the shot, like by having your main lighting behind the camera
- Camera person: make sure you’re not casting shadows onto your subject
- Camera
- When possible, use a tripod or gimbal to keep the camera steady
- If shooting handheld, keep your movements as smooth as possible
- Interactions
- For shots where people are interacting, try to shoot both sides of the interaction
- Example: if a guest walks in and is greeted by the receptionist, film one shot from the perspective of the guest and one shot from the perspective of the receptionist
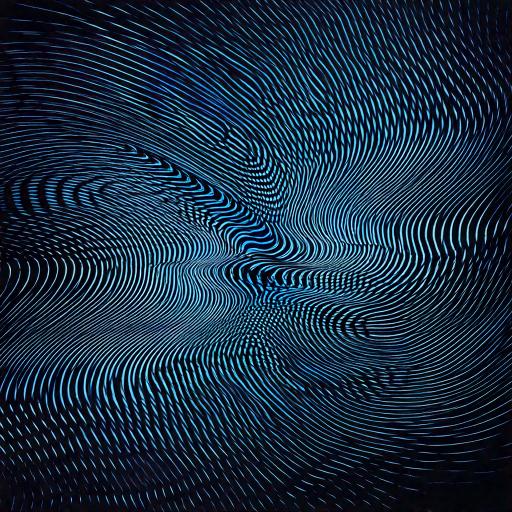
Moiré Effect Warning
Avoid any tight lines, or even mesh. Just to be sure, avoid any anything that resembles tight patterns at all. This might be someone’s clothing, a window screen, or anything else in frame. Cameras make that look like this example image, and it’s just… nasty. Don’t do it or your video will look like weird vibrating lines. Avoid!
Moiré Pattern on Wikipedia, to learn more about the nerd reasons why this happens.
How To Record Good Audio
If it wasn’t emphasized enough above, your audio is critical! Video keeps attention and adds context, but audio is where the real meat of your messaging resides. This is where you form connection and communicate information far more efficiently than capable with text or graphics in your video. Here’s how to improve the quality of your audio.
Best Practices for Audio
- Quiet On The Set, Please
- Microphones uh, they pick up sound. Make sure it’s intentional.
- Background talent talking? We can hear that. Someone giggling behind the camera? That’s not professional.
- Anyone near the production should be well aware of the expectations of silence while clean audio is being recorded.
- Reduce Background Noise
- Observe and reduce the sources of background ambient noise.
- Air Conditioners are a guilty culprit that is often forgotten. Our brains our trained to reduce this in our minds, but a microphone picks up the static noise of an air conditioner. For best audio, you may want to briefly turn off the AC.
- Other fans, electronics (vibrating cell phones), these are often forgotten items that interfere with audio quality
- Be Mindful of Echo and Room Acoustics
- Large rooms, particularly those with solid / flat surfaces will echo, some to the point of distraction or unusable audio.
- Try to record audio in smaller rooms, particularly those with soft surfaces like carpet, curtains and soft furniture (or a dedicated audio recording environment)
- Use Pop Filters and Wind Protection
- Use a pop filter indoors to reduce harsh “P” and “B” sounds and a windscreen or dead cat cover outdoors to minimize wind noise, ensuring clean and intelligible recordings.
This is your production and your set!
Control the area and respectfully ask for silence when audio is being recorded.
Editing & Post Production
Everything we’ve covered so far is about planning and collection of video and audio. Now is the time to fully execute our plan – assembling the pieces!
If we’re editing your video for you, move on to the next section!
We may have available incentives, discounts or even Complimentary video production services available for Connected TV advertisers with Levy Online.
Effective video editing involves careful organization, consistency in style, and attention to detail in both visuals and audio. By organizing assets, cutting thoughtfully, and balancing audio and effects, you create a polished and engaging video that aligns with the intended audience and message. Follow your script and plan.
Best Practices for Your Connected TV Video Post Production
- Organize Your Footage and Assets First
- Begin by organizing your video files, audio, and graphics into folders or labeled bins in your editing software.
- This structure saves time and helps streamline the editing process.
- This organizing will be valuable later if you need to create additional versions, such as alternate language, alternate shots. Example: substituting a voiceover and a clip with the intention of creating a ‘B’ version for ad testing.
- Use a Consistent Style and Tone
- Establish a visual and audio style that matches the project’s goals, such as consistent color grading, transitions, and music choices, ensuring a cohesive look and feel throughout the video.
- Use transitions based on consistent editing standards:
- cuts are most common way to change a shot, quick and efficient
- dissolve blends scenes together, transitions between slideshow elements, or is used to convey the passing of time
- wipes generally signify scene or location changes or are use for attention-grabbing
- Cut on Action and Maintain Flow
- Cut between shots at moments of action or movement for smoother transitions and a more dynamic flow.
- Avoid abrupt cuts that disrupt the viewer’s experience unless done intentionally for effect. Don’t interrupt an interesting moment of video with a transition.
- Prioritize Your Audio
- Ensure clear and consistent audio by balancing levels, reducing background noise, and using appropriate music and sound effects. Good audio editing enhances viewer engagement and supports storytelling.
- You may roughly establish your shots and voiceover in your sequence, then more precisely time cuts in footage to your audio.
- Experiment with layering on natural sound / environmental noises (deliberately and separately recorded crowd noises, footsteps, or whatever is natural for the environment). Separating this from your voice track(s) and then deliberately bringing it back in a controlled way adds to the realism while maintaining quality.
- Use Color Grading and Effects Sparingly
- You can apply color grading to enhance the video’s look but avoid overdoing effects or filters. These can distract from the content. Subtle adjustments can elevate the video’s professional appeal, but overuse will ruin your authenticity.
Delivering Your Video Ad To Us, Review & Go Live
Now it’s time to take your Connected TV Ad live! We’ll take it from here.
Ensure Quality Specifications Are Adhered To
If we’re editing your video, you don’t need to worry about this one bit! We produce your video ad to the highest format specifications, so even if you’re not currently running on super-premium inventory with the highest requirements (like Hulu/Disney)… you could and our video will be ready for it.
If you’re editing your own video, you’ll need to ensure that these Connected TV Specifications are strictly adhered to. These specs along with our this video content collection guide (literally this article) will have been provided to you in your onboarding and planning. Failing to abide the CTV video specifications will result in some inventory types rejecting your video, or we may need to reject it outright.
Our services for fixing your video’s formatting or upsampling are an hourly production charge (if even possible… we can’t always fix footage if you filmed on a potato).
Delivery of Completed Work
If we’re editing your video, you’re basically done already! We only require your approval on the video creative before we set it live. Note that revisions or further customizations outside of the production scope may be an hourly production charge, even if your production was provided complimentary.
If you edited and are delivering your completed video to us, please just send us a link via a file-sharing tool (Drop Box, Google Drive, SharePoint, etc.) and make sure you maintain your files. Please back them up as well. We will have access to your finished video files on ad servers, which may be compressed and downsampled versions from your original. Keep your finished and highest-quality video, we will not maintain this enormous video file locally on our systems.
Go Live!
Once your video is provided to us, we’ll get working on distributing to ad servers. Your video may be eligible to go live within a few hours, but ordinarily (and based on various ad server approvals) this will scale up to full-live over several days. Going live is of course contingent on your overall strategy being ready to deploy, not just the video asset itself. Your advertising specialist will be available to answer questions and provide an estimated Live! date based on your video delivery time, budget approval and payment, and campaign readiness.